Flourish restoration
Wooden boat restoration. 'Flourish' was built approxmately 100 years ago on or near the River Fal in Cornwall. She is Carvel construction (tight seamed; no caulking between the planks), 13'6" in length with a beam of 4'3".This site is under construction and I'll add more photos about the constuction and restoration techniques shortly. Please feel free to add some feedback.
Saturday 2 June 2012
Tuesday 28 February 2012
Fitting Out.
Patterning out the hanging knees which fit above the top plank and under the inwale.
Once varnished they're be glued and screwed through the planking aswell.

Making a pattern for the rear bench seat using 3mm pattern-ply and a glue gun.
Gluing-up the blank using re-cycled Sapele.
Fliss and her cousin Freya choosing their seating positions.
Bench seat fitted prior to lateral supports which will sit across the stringers.
Wednesday 22 February 2012
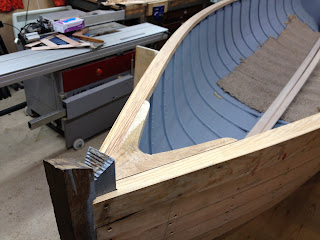
Breasthook and knees.
The Breasthook is a piece of timber that fits into the bow of the boat between the inwales for structural completion. Ideally it is cut out of a grown 'crook' of timber, the grain direction following the the curvature so there is no short grain to fracture. This is a limb of English Oak just right for the job. If you look closely you can see the template marked out prior to fitting.

Dry fitting the knees allowing for the curvature of the transom. They are half lapped as per the original knees and will be fastened with copper nails to secure the overlap as grown knees are difficult to come by...

Dry fitting the knees allowing for the curvature of the transom. They are half lapped as per the original knees and will be fastened with copper nails to secure the overlap as grown knees are difficult to come by...
Thursday 16 February 2012
Steaming Inwales
For the rubbing strake (top plank) and the inwales I decided to use Pitch Pine for its durability and aesthetic, although the the originals I believe were Siberian Larch.
Rather than risk splitting the timber (a fairly hefty 25mm by 35mm section) I pre-stressed it before steam-bending around the top plank as a former. I constructed a fairly crude steam box out of old dust extraction bags stapled together and hooked up the trusty wall paper stripper. Hey presto!
Wednesday 15 February 2012
Oars
Unfortunately I didn't take any photos when I constructed these Oars. They were a pleasure to design and make, but I didn't realise the effort, design and time that goes into them.
I received a lot of guidance from Julian Burns (now retired from Sail and Oar) who kindly explained the principles and construction of Oar making.
They are are built using English Ash; the Looms are laminated in two sections and glued using epoxy resin. The blades are then added before shaping. The length is determined by a number of factors; the beam of the boat, the freeboard (distance from the waterline to the top of the rubbing strake, plus the height to the rowlock) and more...
The transition of the loom to the blades is an elliptical section where strength is only needed in one plane thereby minimising weight. Inboard from the rowlocks the loom is left in the square to counterbalance the weight outboard.
This determined a length of 9'3" for the central rowing position and in time I will make some slightly shorter oars for the forward position as she was was designed as a two man skiff.
Saturday 4 February 2012
Subscribe to:
Posts (Atom)


